Abstract
We first measure the focal length of a lens and then investigate what happens when we cover half of the object or half of the lens. With half of the lens covered we see the entire image dimmed.
The version of the demonstration discussed here is for a larger classroom. It works on a smaller scale, as well.
Portable
Yes – with some effort.
Principles Illustrated
Formation of an inverted real image; measuring focal length. Formation of an image with half of the lens covered: rays from each point on object go to every point on lens and are all redirected to the corresponding image point, so the entire image is visible but is dimmer. Note the dimming can be uneven.
NCEA & Science Curriculum
PHYS 2.3
Instructions
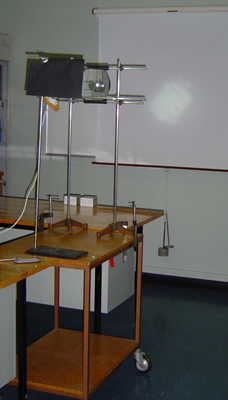
The photos and instructions here are for a large lens to be used in a lecture theatre or at the front of a lab/classroom. The demonstration works on a smaller scale as well.
Secure the large lens carefully. Sections of rubber hose on the metal rods help to hold the lens and cushion it.
There is a three page PowerPoint to accompany the demo.
1. Display and discuss slide one to show what a focal point means. Ask students how to actually measure the focal point.
2. Have two students measure the focal length by placing the bulb far from the apparatus and then looking for a bright spot on a piece of paper.
3. Display and discuss slides two and three to show image formation and the lens equation.
4. The focal length of the large planar convex lens is about 35 cm, so put the light bulb or other object at about 40-45 cm to get a large image on a screen. Students can use the lens equation to predict the location of the image. Their answers are then verified experimentally.
Note: the bulb should be at an angle to show both vertical and left-right flip. Use a bright bulb. This was done with a 27 watt fluorescent.
5. Ask students to predict what will happen when half of the object is covered by sliding a sheet of paper in front the the bulb (use solid black paper and hold the paper to the bulb). The result is that part of the image disappears.
Video showing the results of partly covering the object:
Download video (173 KB, right-click and save as): Cover-object.m4v
6. Ask students to predict what will happen if half of the lens is covered. We saw that covering the object blocks part of the object, but covering part of the lens blocks some fraction of the rays from the whole object and thus dims the whole image. The entire image is still visible although some uneven dimming may be visible depending on the details of the geometry.
Video showing first the results of covering part of the object, then the results of covering part of the lens:
Download video (383 KB, right-click and save as):Â Cover-Object-then-lens.m4v
PPTs for demo
Click on the links but save these files to disk rather than opening them.
Three slide PowerPoint to accompany large lens demo: Converging-Lens.ppt
One slide PowerPoint to accompany covering part of the lens:Â Half-of-a-Lens.ppt
Larger images showing details of the apparatus
Safety
Be careful not the break the bulb, and even compact fluorescent bulbs get hot after a while. The lens is quite heavy!
Individual teachers are responsible for safety in their own classes. Even familiar demonstrations should be practised and safety-checked by individual teachers before they are used in a classroom.
Teaching Resources
Would you like to contribute lesson suggestions? Contact us.
Credits
This teaching resource was developed with support from
The MacDiarmid Institute
Faculty of Science, Victoria University of Wellington
School of Chemical and Physical Sciences, Victoria University of Wellington